Table of Contents
LTI 1.3 Support and Documentation.
IMS Global has deprecated LTI 1.1 in favor of LTI 1.3. While Schoology still currently supports LTI 1.1 we recommend you use LTI 1.3 for new app development.
Schoology is certified LTI 1.3 Advantage Complete. We are in compliance with the following IMS Specs, which LTI 1.3 App Developers must follow as well.
Security
-
IMS Security Framework v1.0 requires implementation of OAuth 2.0 and OpenID Connect.
- For OAuth 2.0 Client-Credentials Grant, Schoology supports JWT requests only, not HTTP Basic Authentication.
- Schoology supports LTI OIDC Login with LTI Client Side postMessages.
-
In order to complete the OAuth 2.0 authentication flow with Schoology, you will need the following information:
- Schoology’s issuer_id: https://schoology.schoology.com
- OIDC Authorization Endpoint: https://lti-service.svc.schoology.com/lti-service/authorize-redirect
- OAuth 2 Access Token Endpoint: https://lti-service.svc.schoology.com/lti-service/access-token
- JWKS URL: https://lti-service.svc.schoology.com/lti-service/.well-known/jwks
- Public Key - Note: This key is subject to change. It is recommended to use the JWKS URL instead - last updated 1/25/2022
-----BEGIN PUBLIC KEY-----
MIIBIjANBgkqhkiG9w0BAQEFAAOCAQ8AMIIBCgKCAQEAtFuJ/V5dgZsY9Iqm2C9O
iwa7gaALye2NbPI8aDCtB49JFppJJKPHS2kikWpg+9FEo4dG1wACoYF1oLWxXxbn
k8rlpWs8m5rh7tM4Y+4AEtGTvD/b6Fp1tdmMHGNjVRfgdYPCn72tvrO4rYDGXiL4
iADhoCsSZ0pxiEuO1Ys82Sf0YMbYqsWJT3YHiHxHy2Bp3lVgdhTfLHktvpnbvN0w
TBGzCK+UI273WatZrK3bU2Teu02vQwao9eqbjKT65Zg64DiYwNH7i49P+FHUfRq7
Yhqrg5q5BY6W9xw0nPlSn7jwVggwVzywMDIYlvQSR2sruqqTU2MBTav7pTSsDdKM
+wIDAQAB
-----END PUBLIC KEY-----
-
Instructions for obtaining your App’s client_id and deployment_id can be found in the ‘Adding your App to Schoology’ section below.
LTI Advantage Extensions
The following are optional LTI services that we support. You can enable any of these for your App, and as part of the installation process, organizations will be alerted that your app uses the enabled services.
- Assignment and Grade Services v2.0
- Deep Linking v2.0
- Schoology supports two Content Item types: LTI Resource Link and HTML Links. If support for other Content Item Types is required, please contact Schoology Support.
- If you want Custom Parameters sent with launch payloads for LTI Resource Links created via Deep Linking, you will need to include the parameters in the ‘custom’ key of your ‘content_items’ entry when creating the link. See IMS Deep Linking Docs for an example.
- Please note, Schoology only generates Deep Linking Launches from the ‘Add Materials’ dropdown in a Course.
- Names and Roles Services v2.0
- Schoology imposes an internal limit of maximum 100 records per request, but paging is supported
Adding your App to Schoology
To become an App Developer in Schoology …
- If you are already a member of an enterprise organization, ask your System Administrator to give you the Schoology Apps:Develop apps permission.
- If you are not a member of an enterprise organization, you must register. Once you are approved, the user you created will be granted permission to create and test your App in Schoology.
- Note: On that registration page, the ‘Company’ field you enter will be displayed as the source of the App in Schoology’s App Center.
How to Add your App to Schoology
-
Navigate to https://app.schoology.com/apps/publisher and click “Add App” to open App Publisher Page.
-
Enter the basic App data. Note that fields with * are required.
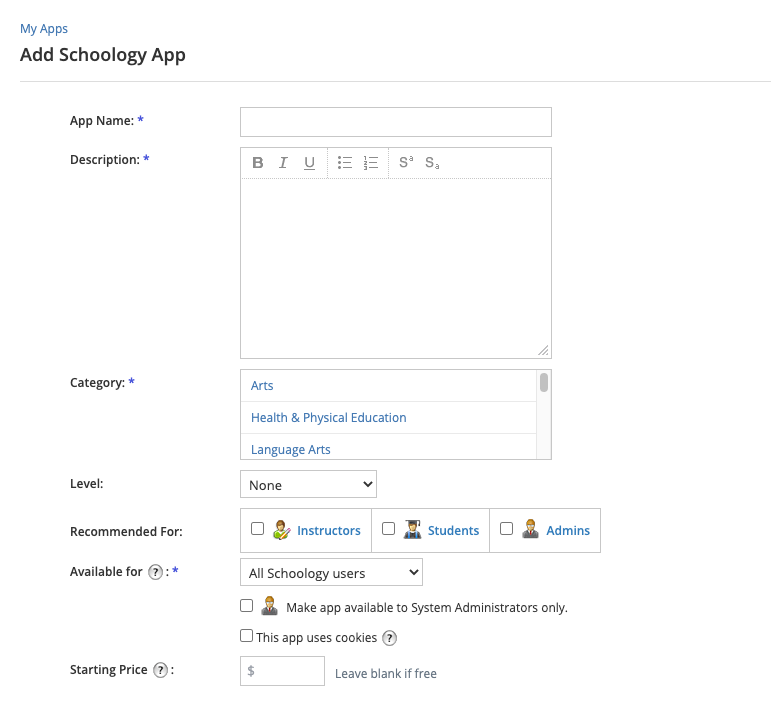
-
Optional: Add images for your App.

-
Required: Select ‘Type of App’, which will reveal additional App-type-specific fields on the page.
-
Required: App Placements: Select where users should be able to find your App (Courses, Groups, User areas).
- App Placement Options differ based on the Type of App you are creating (LTI, Standard or Resource).
- Course Materials placement requires LTI Deep Linking Extension for LTI 1.3 apps, and supports LTI Launch Links (including lineitem data) and HTML links.
- Rich Text Editor placement requires LTI Deep Linking Extension, and only supports LTI Launch Links without lineitem data.
- During the App approval process, Schoology will review the suitability of placements you have selected.

-
Enter Configuration information for your App.
- Select ‘Configuration Type’ = District if each School District needs to use a unique URL to reach your App. Select ‘Configuration Type’ = Manual if your App has a single URL.
- Select any LTI Advantage Extensions your App will use. If any Extensions are selected, you must provide either a Public Key or JWKS URL so that Schoology will be able to verify the JWT tokens you submit.
- If you want additional information included in the launch payload sent from Schoology to your App, you can set Custom Parameters. We recommend setting a key without upper-case letters, because casing data is lost when Schoology processes the custom parameter. Schoology currently supports these Custom Parameter Variables for values.
- Custom Parameters set at App Creation and District Configuration are included in App launches from the Placements in ‘Can be installed for’, but not in LTI Resource launches created by Deep Linking. See Deep Linking for guidance on including Custom Parameters in those launches.
- Following OAuth 2.0 and OpenID Connect requirements, provide an OIDC Login Init URL and Redirect URLs (separated by commas).

-
Required: Click checkbox next to ‘This application meets the Schoology Terms of Use’, then click Submit to create your App.
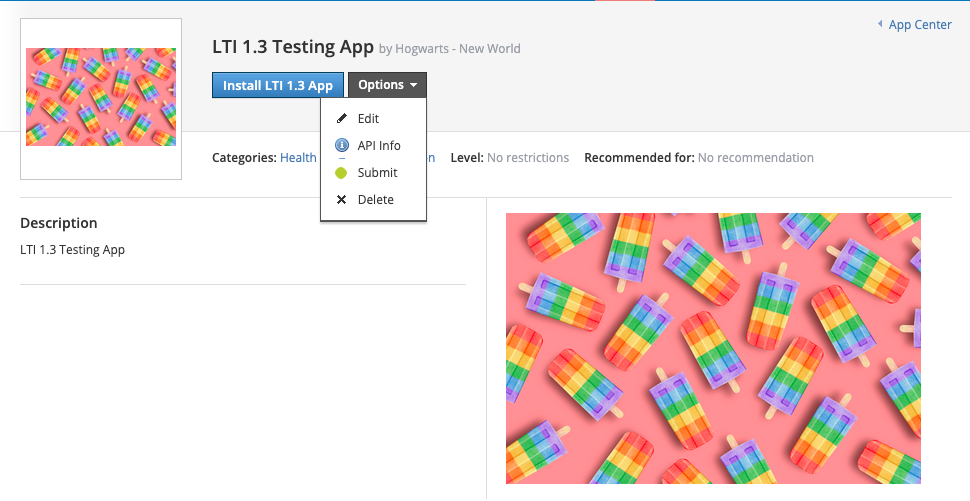
After you create your App, you will be redirected to your App’s Profile page. If you click the ‘Options’ dropdown, then ‘API Info’, you can retrieve your App’s client_id, as well as OAuth 1.0 credentials if you will need to call the Schoology API from your App.
How to Install your App for Testing
-
Instructions for installing your App to your test district. Note: You should install your app from the App Profile Page, as it will not be available in the App Center until Schoology approves it.
-
After you install your App to your test district, you will be redirected to your District’s App list. If you click the Configure button next to your App, you will see the deployment_id for your App in this district.
-
Note: After you install the App to the district, you also need to install it to the areas where it should appear (Courses, Groups, etc). Click the ‘Install’ button next to your app on the District App list to complete that additional installation process.
-
Please consider these testing recommendations as well as the other guidance found in the App Platform documentation.
How to Submit your App for Schoology Approval
If your App is only for use in your School District, you do not need to go through the approval process. Just coordinate with your system administrator for app installation.
- Once you have your App working properly in Schoology, you should submit this form to the Schoology team for review.
- The review process takes up to 1 month. If you have not been contacted within a month of submitting your app through the form, please reach out to Schoology Support. During the review, a member of the Schoology team will install and verify that your App is working as described in your user docs.
- If the Schoology reviewer runs into issues using your App, you will be contacted to resolve the problems.
- If the review completes successfully, you will be contacted via email and your App will be published in the Schoology App Center.
Custom Parameter Variables
If you want additional information included in the launch payload sent from Schoology to your App, you can set Custom Parameters when creating your App. We recommend setting a key without upper-case letters, because casing data is lost when Schoology processes the custom parameter. Schoology currently supports the Custom Parameter Variables in the table below.
Note: Custom Parameters set at App Creation and District Configuration are included in App launches from the Placements in ‘Can be installed for’, but not in LTI Resource launches created by Deep Linking. See Deep Linking for guidance on including Custom Parameters in those launches.
Note: Per IMS spec, for LTI 1.1 apps only, ‘custom_’ will be prepended to the parameter key when it is returned in launch data.
Use:
assignment_title=$com.schoology.Assignment.title
user_timezone=$com.schoology.User.timezone| Variable | Value returned from Schoology |
|---|---|
| $com.schoology.Launch.domain | The domain from which the LTI launch is being made. This may be different from the default Schoology domain. This is useful if an LTI app needs to utilize the Schoology API. |
| $User.id | User Unique ID in Schoology |
| $User.username | Username in Schoology |
| $com.schoology.User.preferredName | User Preferred First Name in Schoology |
| $com.schoology.User.uniqueId | User Unique ID, typically from the SIS |
| $com.schoology.School.id | Unique District ID in Schoology |
| $com.schoology.Primary.Building.id | User Primary Building ID in Schoology |
| $com.schoology.User.timezone | User Timezone |
| $CourseSection.title | Concatenated string containing: “Course Name: Section Name” |
| $com.schoology.CourseSection.id | Schoology Course Section ID |
| $CourseSection.sourceSectionId | Either the Section School Code or the Section Code if provided |
| $com.schoology.Assignment.title | Schoology Assignment Title |
| $com.schoology.Assignment.dueDate | Schoology Assignment Due Date (UNIX format) |
| $com.schoology.Assignment.dueDateIso | Schoology Assignment Due Date (ISO 8601 format) |
| $com.schoology.Assignment.scoreMaximum | Schoology Assignment Total Points |
| $com.schoology.Context.Building.id | Building ID depending on App context:
|
| $ResourceLink.id.history | The most recent five values of resource link id history |
| $Context.id.history | The most recent five values of context id history |